Autogyro
- Card stock or cover stock paper. This is a little heavier than regular computer paper, and comes in fun colors. Look for it in crafts stores, or even office supply stores.
- Tape or paper clips
- Scissors
- A ruler
- If you want (optional): something to decorate your autogyro: gel pens, stickers, markers, or anything else you can think of. The sky’s the limit, if you get the joke!
| Paper flying machine you can make! | |||||||||||
You’ll need: Templates (in color, if you want)
|
The Autogyro
|
||||||||||
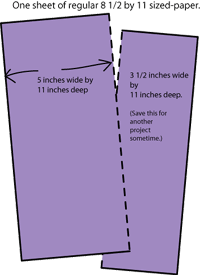
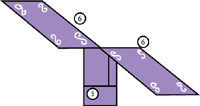
Figure 1.
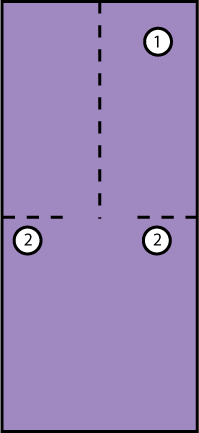
(Figure 2.)
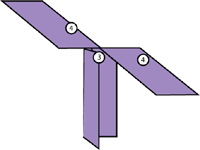
Figure 3.
Figure 4.
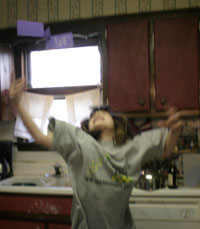
Anne Bushey, 7 years old, holds a autogyro she and Elizabeth Bushey made together as they tested this project to make sure it was actually fun. It was! Anne played with the autogyro for a while, and it really does fly. Just be sure to throw it up as high as you can. |
Step one: Start with a single piece of card stock. A single standard piece of paper is 8 1/2 by 11 inches. You’ll need a piece that’s 5 inches wide by 11 inches deep, so what do you need to do? That’s right! Cut three and a half inches off the long side, just like in the picture. (Figure 1.) If you have a place for large pieces of scrap paper that might still be useful, save this piece for a future project. It would make great quilling strips.
Step two: Cut a five-inch line down the middle of the top end. This will form the wings. (Figure 2.)
Step three: Make two (2) one and a half inch cuts at the bottom of the line you just made. This will finish off the wings, and at the same time, form two flaps below. (Keep scrolling down for more instructions.)
Step three: Fold the flaps you just formed, one on top of the other. They will flap on top of each other, which is OK. Tape them down to hold them shut. Bend one wing toward you, and the other wing away from you. Figure 3
Step four: Fold the bottom of the flaps up twice, about an inch each time. Tape them up to hold them – or, you could use paper clips to hold them. It’s especially cool if you have interesting or different-looking paper clips. Step five: Decorate the wings – any way you like! Step six: Toss the autogyro into the air, and watch it slowly fall in circles. Outside would be a very good place to play with this. Although Elizabeth Bushey is the very unusual kind of Mommy who doesn't mind things like this inside the house, you should DEFINITELY check with your own Mom or Dad before throwing this around in the living room, family room or kitchen. (Elizabeth Bushey also has a kind of a messy house, because she is busy testing projects with kids, for kids all over the world -- so you can't go by her. Always listen to your own Mom, Dad, or whoever is taking good loving care of you.) |
||||||||||